
At work, I was asked whether I wanted to help out on a project dealing with a robot that could do autonomous navigation and combine this with both speech recognition and most importantly: face recognition. The moment I heard about this project, I knew I wanted to be involved :)
During the course of the project, we got asked whether we would be able to have the robot ready before the 18th of November: Deloitte was sponsoring the TEDx in Amsterdam and it would be great to show the robot at the Deloitte stand. Fortunately, we were able to finish everything before the 18th:
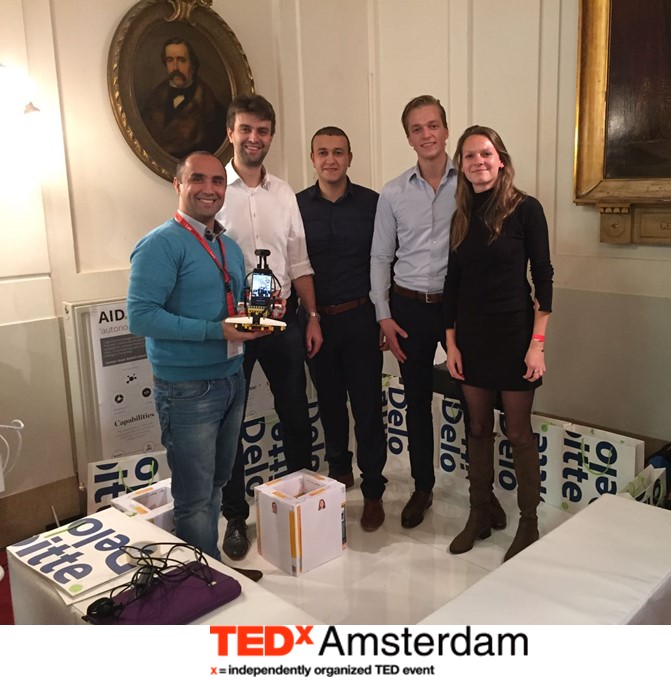
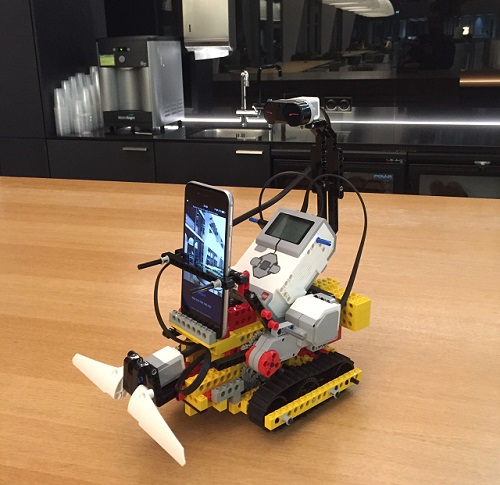
Although the robot is visible in the picture above, being held by Naser Bakhshi, you cannot see it that well, so below a close-up of the robot we demonstrated at the TEDx:
As mentioned, one of the features of our robot is that it will do face recognition. In order do this, the first thing we will have to do is to detect faces and keep tracking them. In this blog post, I want to focus on showing how we made use of Python and OpenCV to detect a face and then use the dlib library to efficiently keep tracking the face.
Detecting a face
After we decided to make use of Python, the first feature we would need for performing face recognition is to detect where in the current field of vision a face is present. Using the OpenCV library, you can make use of the HAAR cascade filters to do this efficiently.
During the implementation, we made use of Anaconda with Python 3.5, OpenCV 3.1.0, and dlib 19.1.0. If you want to use the code in this article, please make sure that you have these (or newer) versions.
In order to do the face detection, we first need to perform a couple of initializations:
#Import the OpenCV library
import cv2

#Initialize a face cascade using the frontal face haar cascade provided
#with the OpenCV2 library
faceCascade = cv2.CascadeClassifier('haarcascade_frontalface_default.xml')

#The deisred output width and height
OUTPUT_SIZE_WIDTH = 775
OUTPUT_SIZE_HEIGHT = 600

#Open the first webcame device
capture = cv2.VideoCapture(0)

#Create two opencv named windows
cv2.namedWindow("base-image", cv2.WINDOW_AUTOSIZE)
cv2.namedWindow("result-image", cv2.WINDOW_AUTOSIZE)

#Position the windows next to eachother
cv2.moveWindow("base-image",0,100)
cv2.moveWindow("result-image",400,100)

#Start the window thread for the two windows we are using
cv2.startWindowThread()

rectangleColor = (0,165,255)
The rest of the code will be an infinite loop that retrieves the latest image from the webcam, detects all faces within the image, draws a rectangle around the largest face, and finally shows the output in a window.
The above can be achieved with the following code within an infinite loop:
#Retrieve the latest image from the webcam
rc,fullSizeBaseImage = capture.read()

#Resize the image to 320x240
baseImage = cv2.resize( fullSizeBaseImage, ( 320, 240))


#Check if a key was pressed and if it was Q, then destroy all
#opencv windows and exit the application
pressedKey = cv2.waitKey(2)
if pressedKey == ord('Q'):
cv2.destroyAllWindows()
exit(0)


#Result image is the image we will show the user, which is a
#combination of the original image from the webcam and the
#overlayed rectangle for the largest face
resultImage = baseImage.copy()


#For the face detection, we need to make use of a gray colored
#image so we will convert the baseImage to a gray-based image
gray = cv2.cvtColor(baseImage, cv2.COLOR_BGR2GRAY)
#Now use the haar cascade detector to find all faces in the
#image
faces = faceCascade.detectMultiScale(gray, 1.3, 5)


#For now, we are only interested in the 'largest' face, and we
#determine this based on the largest area of the found
#rectangle. First initialize the required variables to 0
maxArea = 0
x = 0
y = 0
w = 0
h = 0


#Loop over all faces and check if the area for this face is
#the largest so far
for (_x,_y,_w,_h) in faces:
    if  _w*_h > maxArea:
        x = _x
        y = _y
        w = _w
        h = _h
        maxArea = w*h

    #If one or more faces are found, draw a rectangle around the
    #largest face present in the picture
    if maxArea > 0 :
        cv2.rectangle(resultImage,  (x-10, y-20),
	    		    (x + w+10 , y + h+20),
		    	    rectangleColor,2)


#Since we want to show something larger on the screen than the
#original 320x240, we resize the image again
#
#Note that it would also be possible to keep the large version
#of the baseimage and make the result image a copy of this large
#base image and use the scaling factor to draw the rectangle
#at the right coordinates.
largeResult = cv2.resize(resultImage,
		     (OUTPUT_SIZE_WIDTH,OUTPUT_SIZE_HEIGHT))

#Finally, we want to show the images on the screen
cv2.imshow("base-image", baseImage)
cv2.imshow("result-image", largeResult)
Tracking the face
The above code for face detection has some drawbacks:
- The code might be computationally expensive
- If the detected person is turning his/her head slightly, the haar cascade might not detect the face anymore
- Very difficult to keep track of a face between frames (i.e. to later only do face recognition one a detected face once and not in every loop).
A better approach for this is to do the detection of the face once and then use the correlation tracker from the excellent dlib library to just keep track of the relevant region from frame to frame.
For this to work, we need to import another library and initialize additional variables:
import dlib

#Create the tracker we will use
tracker = dlib.correlation_tracker()

#The variable we use to keep track of the fact whether we are
#currently using the dlib tracker
trackingFace = 0
Within the infinite for-loop, we will now have to determine if the dlib correlation tracker is currently tracking a region in the image. If this is not the case, we will use a similar code as before to find the largest face, but instead of drawing the rectangle, we use the found coordinates to initialize the correlation tracker.
#If we are not tracking a face, then try to detect one
if not trackingFace:

    #For the face detection, we need to make use of a gray
    #colored image so we will convert the baseImage to a
    #gray-based image
    gray = cv2.cvtColor(baseImage, cv2.COLOR_BGR2GRAY)
    #Now use the haar cascade detector to find all faces
    #in the image
    faces = faceCascade.detectMultiScale(gray, 1.3, 5)

    #In the console we can show that only now we are
    #using the detector for a face
    print("Using the cascade detector to detect face")


    #For now, we are only interested in the 'largest'
    #face, and we determine this based on the largest
    #area of the found rectangle. First initialize the
    #required variables to 0
    maxArea = 0
    x = 0
    y = 0
    w = 0
    h = 0


    #Loop over all faces and check if the area for this
    #face is the largest so far
    #We need to convert it to int here because of the
    #requirement of the dlib tracker. If we omit the cast to
    #int here, you will get cast errors since the detector
    #returns numpy.int32 and the tracker requires an int
    for (_x,_y,_w,_h) in faces:
        if  _w*_h > maxArea:
            x = int(_x)
            y = int(_y)
            w = int(_w)
            h = int(_h)
            maxArea = w*h

    #If one or more faces are found, initialize the tracker
    #on the largest face in the picture
    if maxArea > 0 :

        #Initialize the tracker
        tracker.start_track(baseImage,
                            dlib.rectangle( x-10,
                                            y-20,
                                            x+w+10,
                                            y+h+20))

        #Set the indicator variable such that we know the
        #tracker is tracking a region in the image
        trackingFace = 1
Now the final bit within the infinite loop is to check again if the correlation tracker is actively tracking a face (i.e. it could be that it just detected a face with the above code). If the tracker is actively tracking a face in the image, we will now update the tracker. Depending on the quality of the update (i.e. how confident is the tracker about whether it is still tracking the same face) we either draw a rectangle around the region indicated by the tracker or we indicate we are not tracking a face anymore:
#Check if the tracker is actively tracking a region in the image
if trackingFace:

    #Update the tracker and request information about the
    #quality of the tracking update
    trackingQuality = tracker.update( baseImage )


    #If the tracking quality is good enough, determine the
    #updated position of the tracked region and draw the
    #rectangle
    if trackingQuality >= 8.75:
        tracked_position =  tracker.get_position()

        t_x = int(tracked_position.left())
        t_y = int(tracked_position.top())
        t_w = int(tracked_position.width())
        t_h = int(tracked_position.height())
        cv2.rectangle(resultImage, (t_x, t_y),
                                    (t_x + t_w , t_y + t_h),
                                    rectangleColor ,2)

    else:
        #If the quality of the tracking update is not
        #sufficient (e.g. the tracked region moved out of the
        #screen) we stop the tracking of the face and in the
        #next loop we will find the largest face in the image
        #again
        trackingFace = 0
As you can see in the code, we print a message to the console every time we use the detector again. If you look at the output of the console while running this application, you will notice that even if you move quite a bit around on the screen, the tracker is quite good at following a face once it is detected.
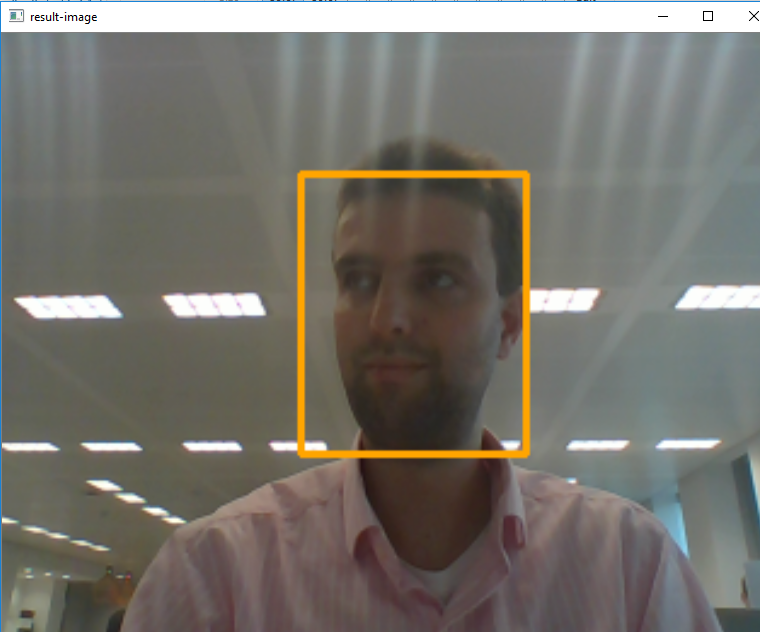
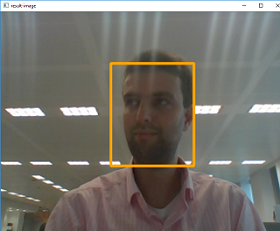
When using the above code, you should see a screen similar to the following, where the program indicates it detected my face:
Will also do some follow-up posts on how we did the face recognition.