Include help/instructions in cookiecutter prompts Although I really like cookiecutter since it enables you to really start a lot of different projects in exactly the same way, one of the things that I think could
Problems with anaconda and pip For the last couple of years, I have always turned to anaconda/miniconda for creating virtual environments with python, both under windows and linux. Although it is possible to work
dvc 'Automating' DVC stage generation So recently, I have started to work with DVC to create reproducible pipelines. In my previous post about DVC I wrote about dealing with multiple different types of model in
dvc Multiple different models with DVC Recently, started to play around with DVC and although the main idea is very cool and quite clear (and the tutorials were also quite clear), one of the things I
datascience Keeping pandas dataframe column names when using Pipeline with OneHotEncoder In this post, I will show how to create a simple custom scikit-learner Transformer that allows you to easily deal with OneHotEncoders and Pandas Dataframes. Recently, I re-started working more
livy-submit Submitting pyspark jobs to Livy with livy_submit For some of the things I am currently working on, I am using a Spark cluster. However, direct access is not possible and the only two ways that I can
Python Implementing a simple plugin framework in Python Recently, I had the need to work with a plugin-based architecture, where the plugins needed to be shareable amongst different projects in an easy way. In order to do so,
d3.js Wrapping my head around D3 rotation transitions Although the majority of my posts are about more technical things, tips and tricks, and things like Docker containers, I am also interested in visualization. When I was working at
raspberrypi Solving timeouts with IguanaIR transceiver and raspberry pi Sometimes you encounter problems for which a variety of solutions might exist. Some of these solutions are clean, and some of these solutions feel like a very duct-tape solution. However,
Docker Sharing all your Docker data volumes via Samba So as I once wrote in an earlier blog article, I am able to use Docker for Windows on my laptop at work, but I am not able to bind
Connecting to Qlik Sense Server with HTML5 and Enigma.js At the Analytics & Information Management service line at Deloitte, we are working a lot with QlikView and Qlik Sense. After a recent training on the engine API, one of
Marking all messages as read in Outlook with cached exchange mode The other day I wanted to clean up my mailbox (the number of unread messages had gotten quite high). Though all my recent emails were all read, there was still
Docker Listing information for all your named/unnamed data volumes After having played with Docker for some time on my computer, I have started to gather quite some images on my hard disk... In his post, Brian Christner provided a
Docker Accessing container contents from another container I have had it a couple of times already that I am running a container and quickly want to see the contents of some of the files that are in
trick Clever bit tricks with ASCII Quite some years ago, I started my adventures in the wonderful world of programming. The tool of choice for me at that point of time was QBasic. Besides the obvious
Deloitte Alternative way to share persistent data between windows host and containers If you look at the historical articles on this blog, you will see that about 1 year go I restarted the blog after I got infected with the container virus
ViM Completion tricks in ViM Somewhere in 2000, I got infected with the ViM virus :) By accident, I started ViM in a terminal and did not know how to actually quit the program. The only way I knew how to get my terminal back was to switch to another
Automatic upload of Forerunner 305 activities to Strava under Linux Like Homer, recently I have picked up running again :) Since I love gadgets and tech stuff any run only counts when it is published on Strava :) And since I want to automate everything that can be automated, I needed a way to automatically upload
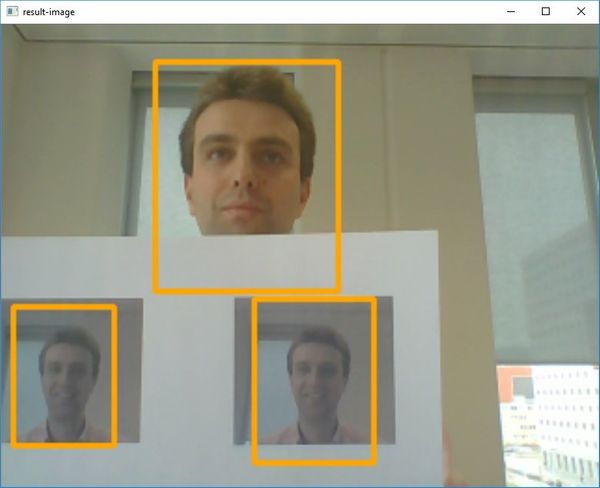
Deloitte Tracking multiple faces In my previous blog article I showed how you can use the excellent OpenCV and dlib libraries to easily create a program that can detect a face and track it
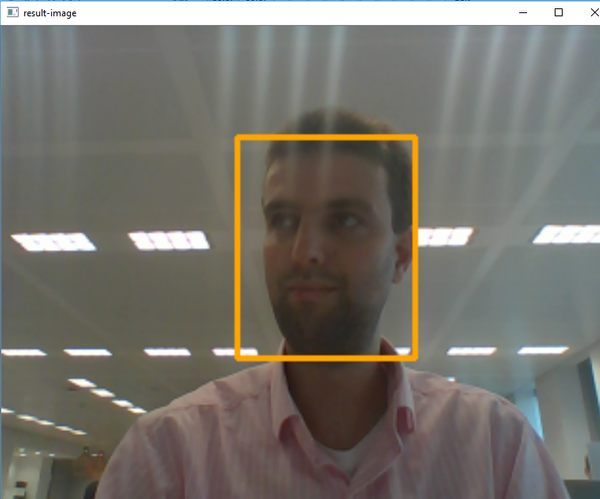
Deloitte Detecting and tracking a face with Python and OpenCV At work, I was asked whether I wanted to help out on a project dealing with a robot that could do autonomous navigation and combine this with both speech recognition
Docker Notification of new USB devices in docker container When I first got in contact with Docker, I wanted to use it for everything! So when I picked up running again with my Garmin Forerunner 305, I wanted to
Moved latex-beamer related sources to GitHub During my Ph.D. years, I was very active with using LaTeX-beamer for creating my slides and I really loved the simplicity of the package. Unfortunately, nowadays not using it
Docker Transfer docker data volume to another host One question I had myself already, but was also asked on twitter after my very first Docker post about cloning a Docker named data volume on one computer was: "
Docker Cloning Docker data volumes Three weeks ago, I got infected with this contagious virus, the symptoms of which are that you are trying to containerize everything :) Sure, I did hear about it for quite some time, but never got involved with it myself. The source of my infection
Docker Activating my blog again with containers As usual, the biggest problem with a blog is that in the beginning you start it with full enthusiasm, but after some time you get busy with doing other stuff again and maintaining the blog gets lower and lower on the priority list.... If